Slow Cooker Chicken and Dumplings

I have a 6 quart Crock Pot, but when it’s time to drop in the dumplings, I move the mixture to a large pot to finish up on the stove-top. We like a lot of broth and I’m always fearful the 6 quarts won’t be enough. It’s time I buy a larger slow cooker.

INGREDIENTS

  • 2 TBSN butter
  • 4 chicken breasts (boneless, skinless)
  • 2 cans of cream of chicken soup
  • 1 small onion (diced) (this is when the little electric chopper comes in handy)
  • Chicken broth (enough to completely cover the chicken)
  • 1 tsp ground, black pepper
  • ½ tsp salt
  • 2 small packages of Grands Jr. biscuits (or your favorite homemade biscuit dough)

METHOD

Put butter, chicken, soup, onion, salt and pepper in a greased slow cooker. Pour enough broth to completely cover the chicken.

Cook on high for 5 or 6 hours.

About 30 minutes before the time is up, tear up the biscuits and roll the torn pieces in flour. The flour will thicken your broth and keep the dumplings from sticking together. Drop the floured biscuits into the mixture and cook for about 30 minutes (making sure chicken is done). Salt and pepper to taste.

Homemade Cinnamon Rolls with Cream Cheese Frosting

My son raves about cinnamon rolls his friend’s mom makes and sells. I love to bake bread and decided I’d find something online and see if I could come close to his description of her gooey sweet rolls. This recipe is found on Allrecipes.com but I made a few adjustments. It isn’t hard but takes a while to prepare. It’s also a very sticky dough. Be prepared to get a little messy.

Dough

  • 1 cup milk
  • ½ cup butter
  • 1 cup water
  • 1 tablespoon active dry yeast
  • 1 cup white sugar
  • 1 tsp salt
  • 2 eggs
  • 6 cups all-purpose flour

Brown Sugar Cinnamon Filling

  • 2 tsp ground cinnamon
  • 2 cups brown sugar
  • ½ cup butter, softened

Cream Cheese Frosting

  • 2 cups confectioners’ sugar
  • 1 (8 ounce) package cream cheese, softened
  • 1 TBSP butter, softened
  • ½ tsp vanilla extract
  • 3 TBSP milk


  1. Warm the milk over low to medium heat. As soon as tiny bubbles begin to form around the edges of the milk, remove the milk from the heat.
  2. Mix the butter with the milk until the butter is melted.
  3. Add the water and let the milk, butter and water mixture cool to lukewarm.
  4. In a large mixing bowl, add the milk mixture, sugar and yeast. Stir to dissolve the sugar and let the mixture stand for about 10 minutes. **This is important for the yeast to activate.


While you are kneading the dough in the next step, preheat your oven to 175 degrees. If your oven doesn’t go as low as 175, don’t heat higher than 200 degrees. Once it hits the temperature, leave it on for five minutes and then turn it off.


  1. To the mixture from step 4, add salt, eggs and 2 cups of flour. Mix to combine. Then add ½ cup flour at a time of remaining flour, beating after each addition. When the dough has pulled together, turn it out on a lightly floured surface. Let it rest about 10 minutes and then knead the dough for at least 8 minutes. IF YOU HAVE A DOUGH HOOK, on your stand mixer, I recommend using it for this sticky dough. If not, the hand kneading is sticky but works.
  2. Put the dough in a greased mixing bowl (large bowl at least twice the size of the dough). Place a lightly damp towel over the bowl and place the bowl in the middle of the warmed oven (make sure the oven is not on). Let the dough rise for about an hour.
  3. Turn out the risen dough on a lightly floured surface. Cut it into two equal parts.
  4. Roll each part into about a 13×9 rectangle. This dough is really hard to roll into a rectangle. Since it’s so “springy,” it doesn’t shape well. I have a large butcher block cutting board and have better luck when I use this for my “lightly floured surface.” Others posted in their reviews on allrecipes.com they rolled it out as much as they could and then pulled the corners out by hand.
  5. Once the dough is rolled out, mix the ingredients for the cinnamon and brown sugar filling. (I mix this in two separate bowls, halving the ingredients for each bowl. I have more to clean up this way but it’s easier for me to put equal amounts into each dough rectangles.)
  6. Spread half of the mixture over each rectangle (if you didn’t separate it into two bowls). Leave about ¼ to ½ inch at the top, long edge free of the mixture. Starting from the edge closest to you (long edge), roll the dough leaving the top edge showing (mixture free). Wet the top edge with a little water. Then finish rolling the dough. This will seal the roll.
  7. Using a sharp knife OR flavor free dental floss to cut the roll into 12 pieces. Place 12 rolls in a greased 13×9 pan. Cover and let rise in refrigerator overnight. (OR cover and let rise on your counter for about 2 hours.)
  8. Repeat steps 10 and 11 for the other rectangle of dough.
  9. In the morning, I let mine rise for another hour on the counter but it isn’t necessary. Bake at 375 degrees for 22 – 25 minutes.
  10. While the rolls are baking combine confectioners’ sugar, cream cheese, butter and vanilla. Add milk gradually until the frosting is smooth. Spread over warm rolls.

These rolls freeze really well, but if you don’t want to make 24 rolls, simply half the recipe. You can also add chopped pecans and raisins to the brown sugar mixture. I have added cinnamon and brown sugar to the bottom of the greased pan prior to adding the rolls. After the rolls cook, I immediately turn them upside down on a tray. The cinnamon and brown sugar caramelize the top for an even sweeter treat.

My family and friends love them. It does take some work, but it’s always an appreciated hit.

Easy Vanilla Apple Smoothie

In my quest for better health, I enrolled in a program offered by the lovely HMM ladies in 2014. One of the beauties is a wife and mom of three who works hard to provide healthy, whole food options for her children. She shared a protein shake recipe that my picky eaters ask for often. I can’t find the exact recipe on the blog but have permission to post my version (just in case my memory is better than I remember and I am posting the actual recipe).

This makes about three servings.

2 Granny Smith apples, cored and stems removed. (A melon baller works wonderfully to core an apple.)

10 ounces of unsweetened almond milk (we prefer the unsweetened vanilla almond milk)

1 cup of vanilla Greek Yogurt

1 TBSP of chia seeds

1 TBSP of nutritional yeast flakes

1 tsp vanilla

About 5 ice cubes

Throw it all in the blender and blend it up!

This is a favorite treat for my little ones any time of the year. Enjoy!


Best Meat Loaf Ever

A few years ago, I searched the internet for an easy meat loaf recipe. I finally found something easy on cooks.com and saved it to my laptop. About a year later, my laptop crashed and I haven’t been able to find it since.  The following recipe is my version of the recipe I can no longer find online.

This meat loaf won the “This may be better than my Mama’s meat loaf” award from my husband.  I almost feel guilty at how simple it is.

Preheat oven to 350 degrees.

Meat Loaf Ingredients

1.5 lbs ground beef

1 cup chopped white onion

1.5 cup shredded cheese (I use the fiesta blend)

2 eggs

2 slices of bread

1/3 cup milk

1/2 tsp salt

1/2 tsp pepper

Topping Ingredients

3/4 cup brown sugar

3/4 cup ketchup

2 TBSPN mustard

METHOD

In a mixing bowl, beat the two eggs and milk.

Tear up the bread and let it soak in the egg/milk liquid until most of the liquid is absorbed by the bread.

In another large mixing bowl use your hands to mix together the meat, cheese, onion, soaked bread, salt and pepper. Mix well (with your hands) and shape the mixture into a loaf. Cook in a casserole dish or baking dish for 30 minutes.

In another bowl, mix all ingredients for the topping. After the meat has cooked for 30 minutes, spoon the topping over the loaf and return to the oven to cook for another 20 to 25 minutes.

This is another family favorite that I hope is equally loved by yours!

Stretchkin – A Toy Worthy of a Bonafide Review

I have many good memories about my grandparents. Both sets were married more than fifty years and worked hard to shower us grand-kids with love. When I think back on the happiest times of my childhood, usually the memories involve my grandparents.

There is one memory I never understood until I was much older. I was standing outside of my father’s parents’ closed garage as my dad lifted the door. His eyes widened as large as mine as we saw a garage stuffed (and I mean stuffed, you can’t enter the garage without climbing on top of piles) full of trinkets. It was the coolest thing I had ever seen – an endless supply of our awesome Christmas and birthday presents. My dad – on the other hand – was not as happy as I. Apparently my grandfather loved infomercials. If he saw it on TV, he had to have it. His garage, as well as his bank account, were proof.

I don’t remember much more about that day but have reflected on that vision often within the last year. You see, I’m afraid my middle child was born with the fascination by infomercial gene. She is constantly begging for the awesome must haves proudly boasted on Nick Jr. She recently tuned five, and the top two items on her list were a Stretchkin and a Snackeez cup. To her excitement, she received both for her birthday. I decided the Stretchkin’s performance was worthy of a Bonafide Review.

The TV commercial shows children dancing and flipping with their Stretchkins stretching to the limits along with them. Now, my child is taller than most children in her preschool class, but she’s in preschool. The children in the commercial appear to be much older and taller. Their Stretchkin really stretches! My daughter has tried to imitate many of the moves she’s seen in the commercial, but her toy is not as flexible. Within 24 hours, I was already performing a quick stitch job under one of the arms.

First set of stitches needed.

She’s complained her toy doesn’t stretch like the commercial so she no longer attempts to do the splits or cartwheels. She mainly straps her (I’ve been corrected when I refer to the toy as a boy) to her feet and simply walks around the house. Yesterday she asked me to stitch her up again. The straps on the toy’s feet are fraying and tearing from the foot.

Stretchkin Foot

We’ve had the toy for 12 days, and she hasn’t played with the toy each day. In my opinion, the quality of the toy is poor. I wish I could say it keeps her moving, but she’s so afraid of ripping it again, she moves less when it’s strapped to her hands and feet.

The commercial claims the toy is “durable and life-size. The Stretchkins love exercise.” Maybe our Stretchkin was a dud, but she’s needed stitches twice and can’t do much more than cuddle.

I guess the best thing about the toy is my daughter loves it. Even though it doesn’t live up to the hype on the commercial, it’s her buddy. She’s happy with lugging it around and letting it sit and watch her play with her Barbie Dolls. If you want a soft, cuddly, plush toy that can be strapped to your child or hugged throughout the night, I recommend the toy. If you want to be able to do all of the gymnastics or hoops shooting claimed in the commercial, you may need to have a needle and thread handy.

Stretchkin Tag

Slow Cooker Red Beans and Rice

Recently, I was asked to download a few e-cookbooks and try out recipes. So far, I’ve been able to cook a total of one. I planned my weekly menu and created the shopping list for three but the meat selection was limited. The meats in the recipes aren’t unusual or extravagant, but on this trip, my neighborhood grocer had a very limited selection of ground beef, chicken and pork chops.  I was looking for flank steak and a 3 lb chuck roast. Red beans and rice are easy to come by so I decided to give it a try.

This recipe calls for bell peppers. I love raw bell peppers in my salad so I decided to prepare and freeze this recipe on Sunday when I prepped my salads (see previous Salad in a Jar post). It froze really well. When I freeze slow cooker meals, I don’t add the liquid until the day I’m cooking the meal, and I usually freeze the meat in the same bag. As long as you are immediately freezing the ingredients, the meat will be fine. BUT if you are uncomfortable freezing your meat with your other ingredients, simply chop it up according to the recipe and freeze it separately.

Since the recipe came from an e-book, I will only post the link. The author was offering a free download, but I’m not sure how long the promotion will last. Even at $2.99 (retail after the promotion) I recommend trying it out. There are several recipes that looked tasty and easy enough for me to try. So far, the only one I tried was loved by my family. Honestly, I was a little worried my husband wouldn’t like this meal. He likes spicy read beans and rice and this recipe wasn’t very spicy. It does call for red pepper and I didn’t add much for fear my little ones would push the plate away untouched. Without the red pepper, I thought it would be kid friendly and went ahead with it. My husband loved loved it. He had seconds and even said, “This is really good!” So this one is a keeper. Which anything more than a nod or shoulder shrug in response to a healthy recipe is a huge compliment.

The recipe can be found in Slow Cooker Cookbook: 20 Easy-to-follow Slow Cooker Recipes.

There are no bananas in this recipe. 😉

Pre- Red Beans redbeans redbeans1. I

Salad in a Jar

Pinterest overwhelms me. I want to like Pinterest. I’ve tried to look around on the site and sometimes think I may be able to pull something off. But in all honesty, I have more fun viewing the “Pinterest fails” found on other sites (probably because they make me feel normal).

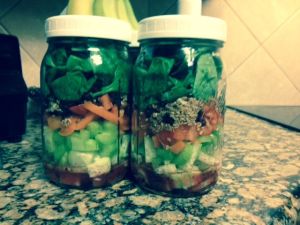
I did, however, see something I knew I could do – Salad in a Jar. When I am at the top of my game preparing healthy meals for my family and me, I plan a menu each week and prep the meals each Sunday afternoon. It can be time consuming, but a couple of hours on Sunday eliminates frustration and unhealthy choices during the week. These days, I need to eliminate as much frustration and “unhealthy” as possible.

The Salad in a Jar is the perfect lunch for me. I never prep more than four jars at a time. Depending on my veggies, sometimes wilting has started by the fourth day. I also find it easier to get the salad out of a wide-mouthed jar vs. the standard jar.

In a quart jar:

1. Put two tablespoons of your favorite salad dressing.

2. Put your hearty veggies in next. They will marinate in your dressing. I love to marinate cucumbers in my dressing, but I’m not a fan of raw celery. I like a good crunch to my salad so I add the celery and enjoy the flavor once it has marinated overnight.

3. I usually put so many hearty veggies in that I don’t leave room for tomatoes. If I left room, this is when I would add tomatoes. Since I don’t usually leave room, I take my tomatoes in a baggy and add them on the day I eat the salad.

4. The salad lasts longer when you keep your leafy greens dry. After my hearty veggies, (and after your tomatoes if you put them in the jar) I always add a dry ingredient. It is usually a layer of flax seeds, cranberries, chopped walnuts or shredded cheese (or all of it). Use what you like as long as it’s dry.

5. Last, add your leafy greens and twist on the lid. DO NOT SHAKE THE JAR. Pop it in the fridge and it’s ready to grab and go.

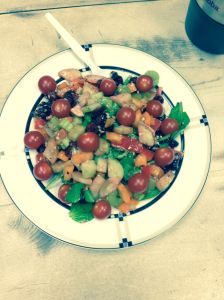
6. When you are ready to eat the salad, shake the jar so the dressing gets all over your veggies and leafy greens. Pour it on to the plate and enjoy. If you like a grilled or lean protein with your salad, add it on the day you eat. My husband will sometimes grill extra chicken breasts for me. I keep them separately and top my salad off with the protein after it’s on the plate.

The trick to longevity is to keep your leafy greens dry. Start with the wettest ingredients on the bottom of the jar and work your way up to the dry leafy greens. I also buy the organic pre-washed spinach. Some people aren’t comfortable with not washing it even when the package says it’s “triple washed.” I get it. Go ahead and wash it if you need to ease your mind, but I wouldn’t prepare four jars. It will wilt faster unless you get most of the moisture off before you put it in the jar.

I took the picture of the plated salad before I mixed it up. I probably should have taken a better picture but was hungry and devoured the food before I determined I needed a better pic. I also use a raspberry vinaigrette so my veggies will marinate well and the flavor compliments my dried cranberries and walnuts. I have used a thicker dressing and have been equally pleased with the result.

Good luck!

jars Salad

Slow-Cooker Sweet Potato Chili

My sister-in-law shared a recipe she found online. If you’ve read any of my other posts, you know my husband is a meat eater. If he’s told something is vegetarian, he immediately decides it’s no good. Because I don’t want my family to starve, I add browned, ground turkey to this recipe. The entire family loves it.

1 lb ground turkey browned (OPTIONAL)
4 Sweet potatoes, peeled and chopped into 2 inch chunks
1 yellow onion diced
2 garlic cloves, minced
1 (15 ounce) can red kidney beans drained and rinsed (I’ve used black before when I didn’t have red)
1 red bell pepper, seeded and chopped
1 (14.5 ounce) can tomatoes w/oregano and garlic
1 TBSP chili powder
1 tsp smoked paprika
1 tsp chipotle chili powder
1/2 tsp salt
1 cup water
1/2 cup fresh juice from orange (I’ve used regular orange juice..from the carton)
Combine all ingredients and cook on low for 6 to 8 hours.

Homemade Coffee Creamer

Have you ever looked at all of the ingredients on the back of coffee creamer products? I hadn’t until someone posted a picture of their homemade creamer on Facebook. There are a lot of ingredients listed! Usually, I drink hot tea in the mornings but sometimes I go through spells where I can’t get enough coffee. I probably should drink my coffee black but don’t so I thought I’d try the recipe posted for a less processed version.

Before I post the recipe, please note this is not a light version, but you can find a diet friendly version with a quick search.

RECIPE

1 can sweetened condense milk

2 cups milk

Put in mason jar and shake it up!  That’s it.  Sugar and milk.

I’ve added some pumpkin pie spice and cinnamon to the jar and it was a wonderful fall treat. You can also add some of the flavor syrups but my desire was to get away from extra ingredients. This is also not as thick as store bought creamer but it is creamier than a teaspoon or two of sugar and milk.

I’ll be completely honest and say I like the store bought creamer’s taste better, but I don’t want to drink all of the extra stuff. I’ve switched and still enjoy my morning coffee.

Summer Squash & Spinach Gratin

I realize summer is over but squash is at my farmer’s market year round. I found the original recipe for this from the gorgeous Hot Moody Mess ladies’ website.  Don’t let the name full you, they are all kinds of hot who figured out how to drop the moody mess.  I tweaked the recipe a bit trying to cut even more calories but either recipe will produce a tasty dish that can be served as a side or even the main dish if you are not married to a man who believes all meals should have a meat as the star of the plate.

You can find the original recipe here.

This is not one of my super easy sides because it does take some time to prepare. HOWEVER, we eat brown rice often in my household. If I know I’m going to make this dish within a day or two of eating brown rice, I will make extra rice and save it.

If you do the chopping ahead of time and measure out your seasoning in a separate dish, mince your garlic, it makes it easier. Also, I use Oregano in pretty much everything. Oregano has been shown over the years to support the immune system. I always look for ways to aide the immune system. The original recipe called for dried thyme which is just as good of flavor as Oregano.

Summer Squash & Spinach Gratin
About 6 servings. Per serving: 184 calories, 16 g of carbs, 10 g of fat, 8 g of protein, 5 g of sugar

1 or 1.5 cups spinach
4 medium summer squash chopped into ½ cubes
2 tbspns olive oil
1 tspn olive oil (to drizzle over finished dish before putting in oven)
2 or 3 large garlic cloves minced
1 medium onion chopped
1 tspn salt
Pepper to taste
1 tspn oregano
¾ cups cooked brown rice
1 tbspn Earth Balance butter spread
½ cup liquid egg whites
½ cup part skim, mozzarella cheese (shredded)
¼ cup crumbled feta cheese
¼ cup bread crumbs

Cook the rice ahead of time. Preheat oven to 375 degrees.
• Spray a deep dish pie pan or casserole dish.
• In a large skillet, cook the onions over medium heat in 2 tbspns of olive oil. Cook until translucent. Then add the garlic. Cook only about 30 seconds.
• Then add your squash and cook for about five minutes, stirring frequently.
• Once your squash is cooked (tender but not too soft, season with the salt, pepper and oregano.
• Combine the rice with the butter in another bowl.
• Remove the squash and onions from heat. Add the rice, eggs whites, mozzarella and spinach.
• Stir mixture well. Pour into the baking dish.
• Add the crumbled feta to the top of the mixture. Then sprinkle the bread crumbs.
• Finally, drizzle the remaining tspn of olive oil over the final mixture and place in oven.

Cook for about 40 or 45 minutes until the top is brown and the gratin is sizzling. Wait about 10 minutes before serving. Can also be served at room temperature.

Enjoy!